MySQL
Setting up a local MySQL database
Overview
This page explains how to install and configure the MySQL database server, and the mysql command line client. This guide will cover how to install and set up these components on your computer for local access.
This guide will cover the following platforms:
Navigate to the sections that match the platforms you will be working with.
Setting up MySQL on Windows
The MySQL project provides a native Windows installer to install and configure your database.
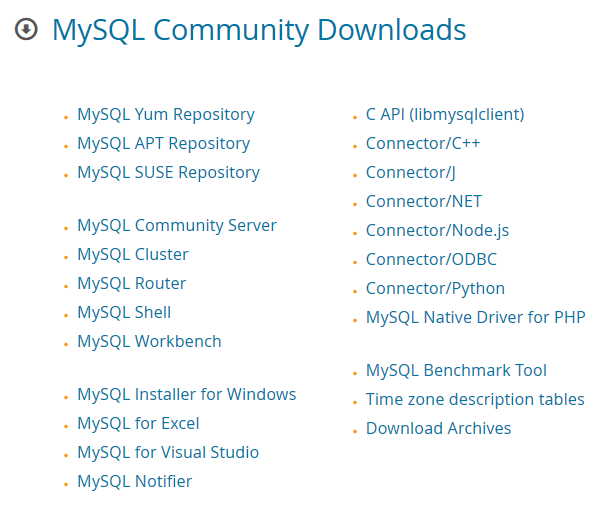
Visit the MySQL download page to find a link to the installer:
Click MySQL Installer for Windows.
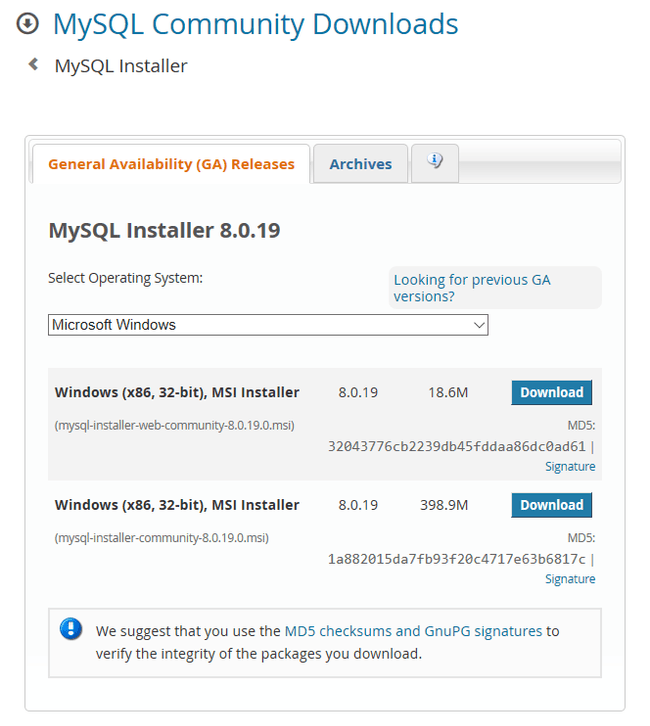
On the next page, you'll have a choice of installers to download:
- web installer: The web installer is a smaller initial download. It will download components as-needed during the installation process. This option works when you have an internet connection during installation.
- conventional (offline) installer: The conventional installer is the larger download. It comes bundled with all of the components and files you will need to install. This makes offline installation possible.
Choose the installer that suits your requirements and click Download.
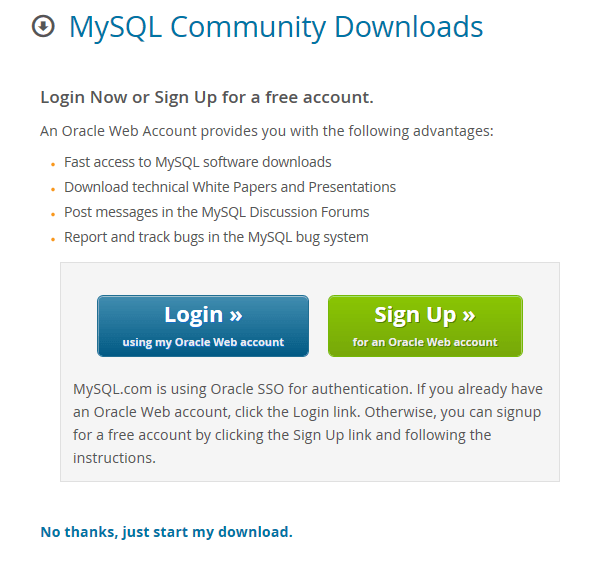
Next, you will be given the option to create an Oracle Web Account. Feel free to skip this by clicking No thanks, just start my download towards the bottom of the page:
Once the download completes, double click on the file to run the installer (you may have to confirm that you wish to allow the program to make changes to your computer).
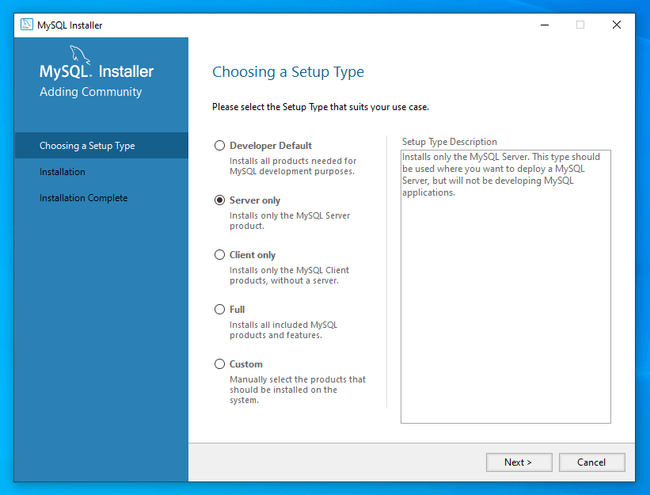
The installer begins by asking what components you would like to install:
For a minimal install, the Server only option contains all of the components you need. Despite its name, this option also includes the mysql command line client. Click Next after making your selection.
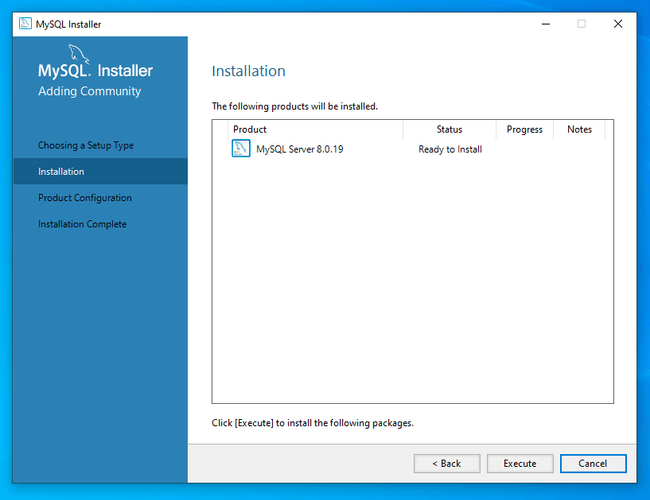
The following page confirms your selection:
If the selection looks correct, click Execute to begin the installation.
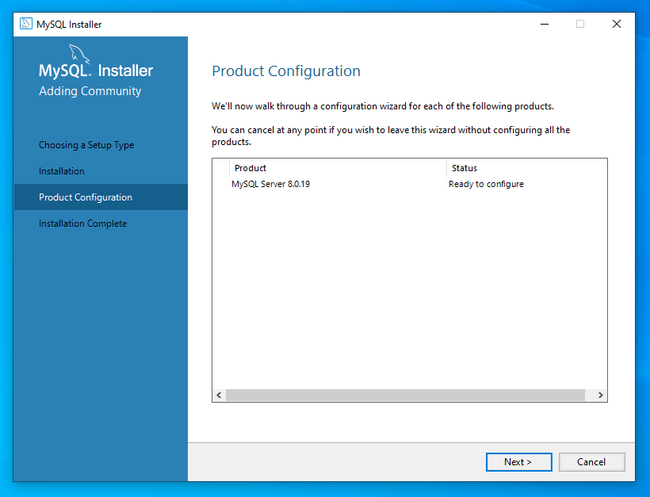
Once the installation is complete, the installer prompts you to configure the new MySQL server:
Click Next to begin the configuration process.
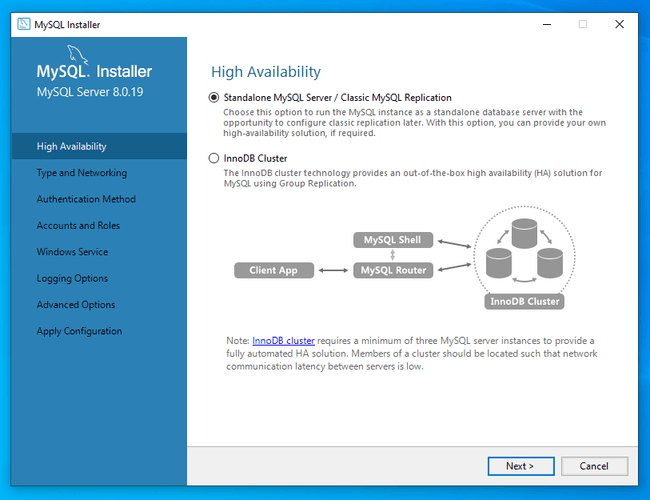
The first configuration option is to select the level of availability for the installation. Since this is a local installation, select Standalone MySQL Server / Classic MySQL Replication.
Click Next to continue.
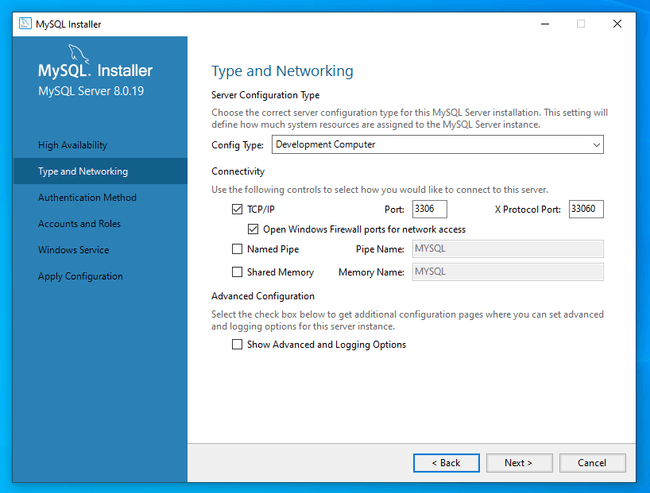
The page that follows allows you to configure your machine type (which influences resource allocation for the server) and the network connectivity.
Development Computer option is usually the best choice if you are using the computer for daily tasks. The default networking options are also usually adequate.
Click Next to move on.
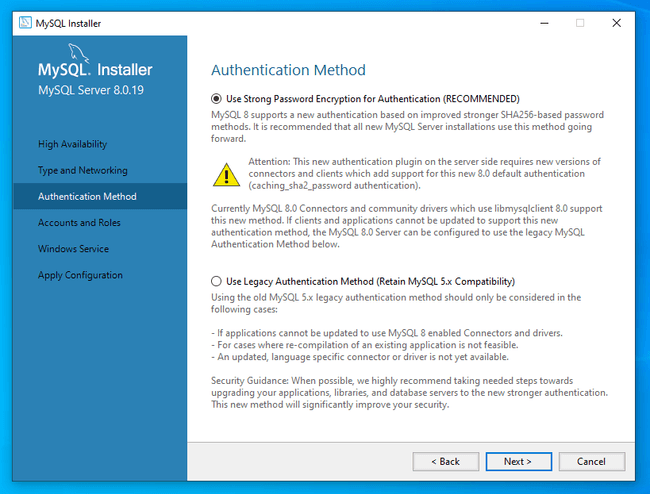
The next page allows you to choose between two authentication encryption methods:
- Strong Password Encryption: Configures more secure authentication for new installations.
- Legacy Authentication: Configures less secure authentication necessary for compatibility with legacy applications.
Unless you have a strong reason not to, choose Strong Password Encryption and click Next to continue.
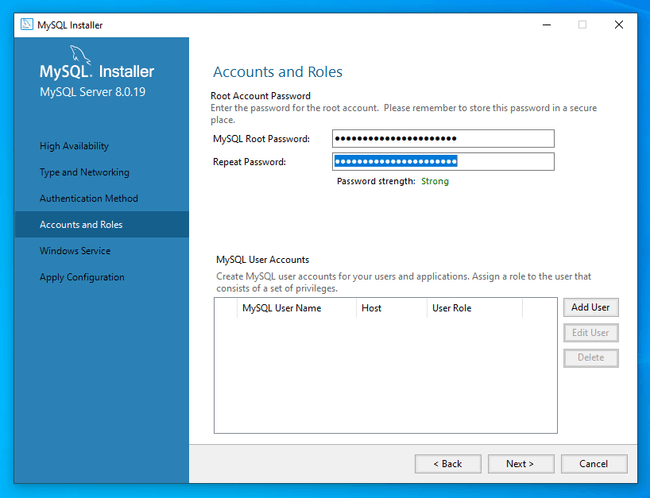
Next, you are prompted to set a password for the MySQL root account, which has administrative privileges for the MySQL installation:
Choose and confirm a strong password. If you want to use this opportunity to add additional user accounts, you can click Add User and follow the prompts. Click Next when you are ready to move on.
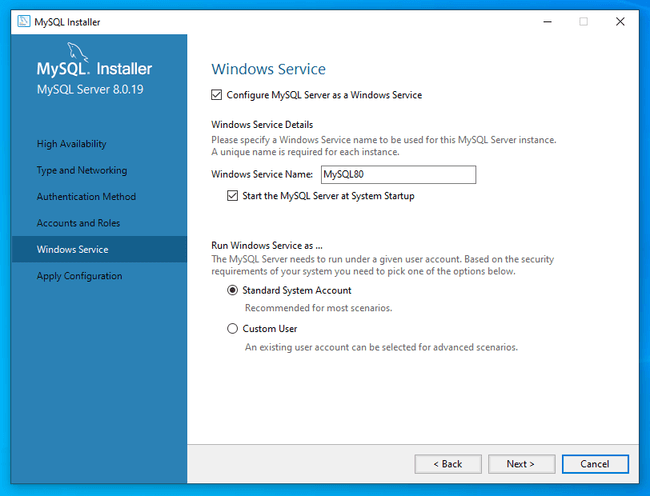
Finally, you'll be asked to configure the MySQL Windows Service:
The default selections work well unless you have specific requirements. Click Next to continue.
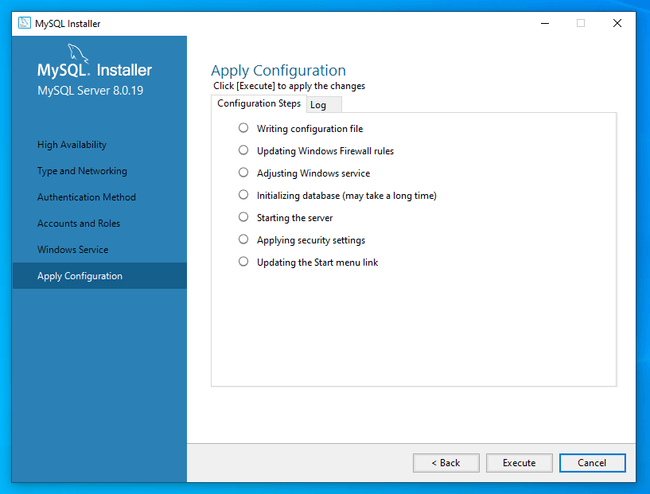
The configuration is now complete.
If you're happy with your selections, click Execute to configure your installation.
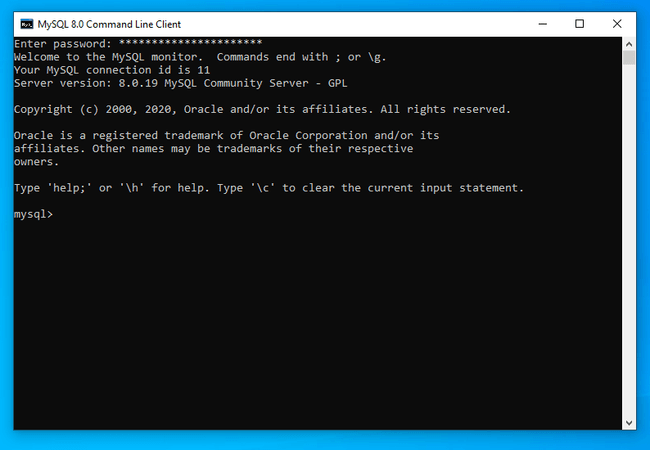
With MySQL configured, you can now test your access using the mysql command line client. In the Windows start menu, search for "mysql" and click the MySQL Command Line Client.
A MySQL window will appear, prompting for a password:
Enter the administrative root password that you selected during configuration. Upon successfully authenticating, you will be given a MySQL prompt where you can interact with your database. Type quit to exit.
Setting up MySQL on macOS
The MySQL project provides a macOS DMG archive to install and configure MySQL.
Visit the MySQL download page and select macOS from the operating system drop down. A few different installation options are available:
Click Download next to the macOS DMG Archive.
Next, you will be given the option to create an Oracle Web Account. Feel free to skip this by clicking No thanks, just start my download towards the bottom of the page:
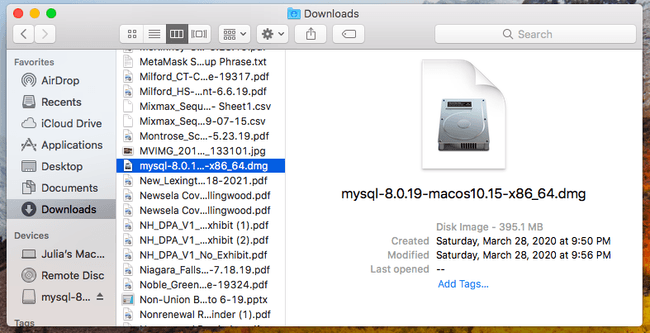
Once the download completes, double click on the file to mount the DMG file:
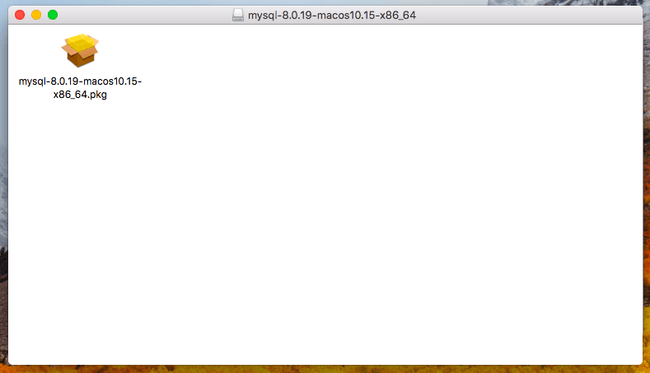
Click on the installer package inside the mounted DMG. You may have to confirm that you wish to allow the program to make changes to your computer:
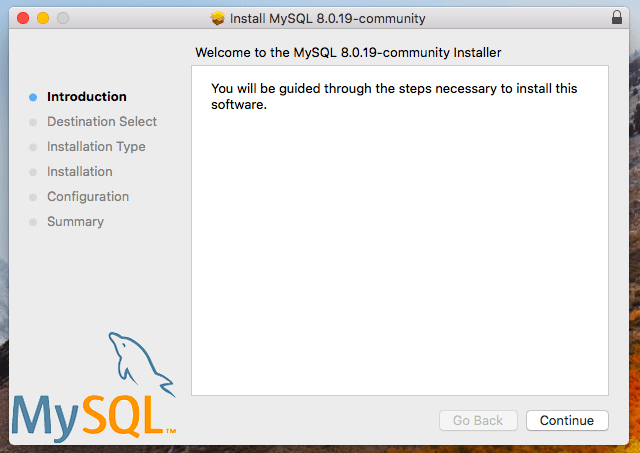
The MySQL installer will launch, displaying the welcome screen:
Click Continue to begin the installation procedure.
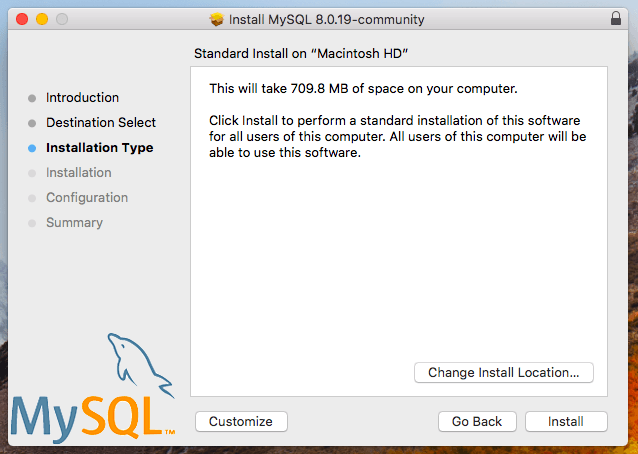
Next, you will be asked to select the installation type:
The standard installation is a good choice for most people, but if you wish to modify things, you can click Customize. When you are happy with your choices, click Install. The installation will then begin.
When the installation is complete, you will be asked to configure MySQL.
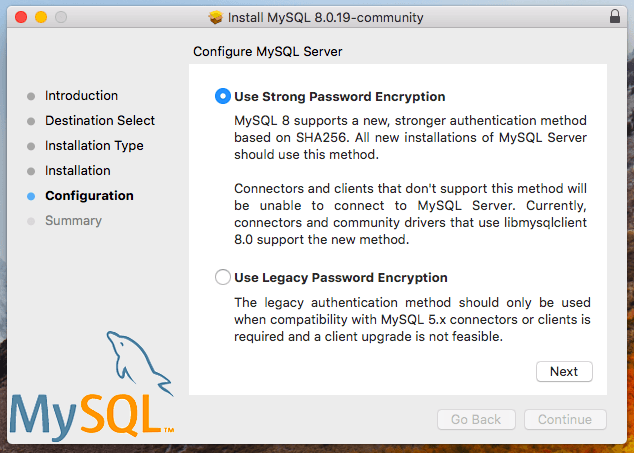
The first configuration page allows you to choose between two authentication methods:
- Strong Password Encryption: Configures more secure authentication for new installations.
- Legacy Authentication: Configures less secure authentication necessary for compatibility with legacy applications.
Unless you have a strong reason not to, choose Strong Password Encryption and click Next to continue.
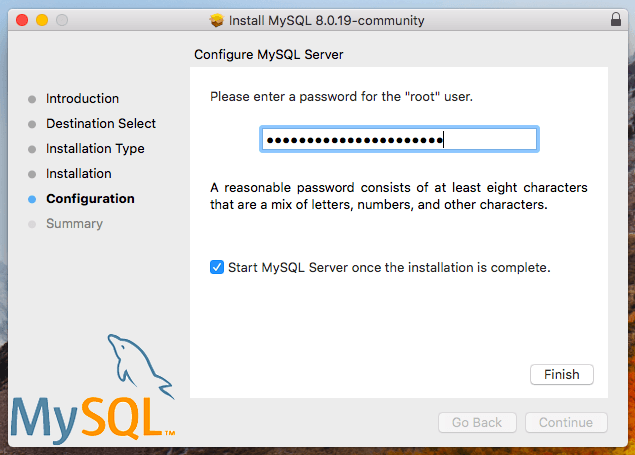
Next, you are prompted to set a password for the MySQL root account, which has administrative privileges for the MySQL installation:
Choose a strong password and click Finish when you are done.
The installer will confirm that the operation was successful:
Click Close to close the window.
The MySQL server should be up and running. To access the mysql command line program, you have to modify your system's PATH environment variable.
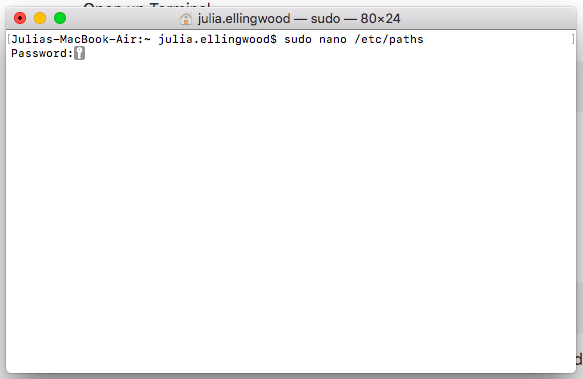
To do so, open a terminal window. Edit the /etc/path file with the following command:
You will be prompted for your computer's administrative password:
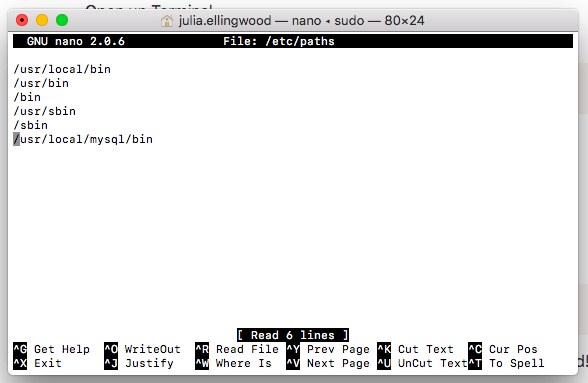
At the bottom of the file, add the /usr/local/mysql/bin directory:
When you are done, save and close the editor by typing CTL-X, Y, and hitting ENTER.
To read the new PATH settings, open a new terminal window. Login to the MySQL database using the root administrative account:
You will be prompted for the password you set up during the MySQL configuration process. After successfully authenticating, you will be given a MySQL prompt:
Type quit to exit when you are finished.
Setting up MySQL on Linux
You can install MySQL on Linux with a number of different methods depending on your Linux distribution and preferences. Choose the link below that best fits your needs:
Debian and Ubuntu
You can either choose to use the version of MySQL available in your distribution's default repositories or use repositories provided by the MySQL project. Packages in the default repository are tested to work with all other software provided for your distribution, but may be older. Packages from the MySQL project will be more up-to-date but may require extra configuration.
- Install using Debian or Ubuntu's default repositories
- Install using the MySQL project's Debian and Ubuntu repositories
Install using Debian or Ubuntu's default repositories
Both Ubuntu and Debian provide versions of MySQL server as packages within their default repositories. The MySQL version may be older than those found on the MySQL website, but this is the simplest way to install on these distributions.
To install MySQL server, update your computer's local package cache with the latest set of packages. Afterwards, install the mysql-server package:
Depending on your version of Ubuntu or Debian, you may be asked to provide and confirm an administrative password for the MySQL server.
After the installation completes, run the mysql_secure_installation script to lock down some of the insecure defaults that may be present. The script will also give you the opportunity to set an administrative password, which you can ignore if you chose one during installation:
Read the prompts carefully to decide which actions you wish to take. If you are not sure, answering Y for "yes" is usually a safe option.
Install using the MySQL project's Debian and Ubuntu repositories
If you need a more up-to-date version of MySQL, you can use the repositories maintained by the MySQL project instead of those provided by your Linux distribution.
To configure the MySQL project's repository, visit the download page for the Ubuntu / Debian repository setup package. Click download and save the file to your computer.
Navigate to the location you downloaded the repository setup package to in your terminal. Install the .deb package with the dpkg command:
During the package configuration, you'll be asked to choose the version of MySQL you wish to target. If you need to change the version of MySQL that the repository is configured for later, you can type sudo dpkg-reconfigure mysql-apt-config to change your selection.
Once you have selected the version of MySQL to target, you can update the local package list and install MySQL by typing:
Depending on your version of Ubuntu or Debian, you may be asked to provide and confirm an administrative password for the MySQL server.
After the installation completes, run the mysql_secure_installation script to lock down some of the insecure defaults that may be present. The script will also give you the opportunity to set an administrative password, which you can ignore if you chose one during installation:
Read the prompts carefully to decide which actions you wish to take. If you are not sure, answering Y for "yes" is usually a safe option.
CentOS and Fedora
You can either choose to use the version of MySQL available in your distribution's default repositories or use repositories provided by the MySQL project. Packages in the default repository are tested to work with all other software provided for your distribution, but may be older. Packages from the MySQL project will be more up-to-date but require extra configuration.
- Install using CentOS or Fedora's default repositories
- Install using the MySQL project's CentOS and Fedora repositories
Install using CentOS or Fedora's default repositories
Both CentOS and Fedora provide versions of MySQL server as packages within their default repositories. The MySQL version may be older than those found on the MySQL website, but this is the simplest way to install on these distributions.
To install MySQL server, use your distribution's package manager to install the mysql-server package:
For CentOS use the yum package manager:
For Fedora use the dnf package manager:
Once the MySQL package is installed, start up the service by typing:
Optionally, you can automatically start MySQL on boot by typing:
Next, run the mysql_secure_installation script to lock down some of the insecure defaults that may be present. The script will let you set an administrative password and other items:
Read the prompts carefully to decide which actions you wish to take. If you are not sure, answering Y for "yes" is usually a safe option.
Install using the MySQL project's CentOS and Fedora repositories
If you need a more up-to-date version of MySQL, you can use the repositories maintained by the MySQL project instead of those provided by your Linux distribution.
To configure the MySQL project's repository, visit the download page for the CentOS / Fedora repository setup package. Click download on the link that matches your distribution (CentOS versions mirror the Red Hat Enterprise version numbers).
Navigate to the location you downloaded the repository setup package to in your terminal. Install the .rpm package with your distribution's package manager.
For CentOS use the yum package manager:
For Fedora use the dnf package manager:
If you are using CentOS 8, you must also disable the system's MySQL module to prevent it from interfering with the repository's MySQL version. To do so, type:
Next, choose the version of MySQL that you wish to target.
For CentOS, check which versions of MySQL are available by typing:
For Fedora use the dnf package manager:
After deciding which version to use, disable the current version and enable the desired version.
For CentOS, use the yum-config-manager command. For example, this is how you would disable MySQL version 5.7 and enable version 8.0:
For Fedora use the dnf config-manager command. For example, this is how you would disable MySQL version 5.7 and enable version 8.0:
Once you set the version of MySQL you want, you can install it using your package manager.
For CentOS use the yum package manager:
For Fedora use the dnf package manager:
Once the MySQL package is installed, start up the service by typing:
Optionally, you can automatically start MySQL on boot by typing:
When the MySQL server is run for the first time, an administrative password is automatically generated and set. Find the password in the log files by typing:
Next, run the mysql_secure_installation script to lock down some of the insecure defaults that may be present. The script will let you change the administrative password and other items:
Read the prompts carefully to decide which actions you wish to take. If you are not sure, answering Y for "yes" is usually a safe option.
