MongoDB
Introduction to provisioning MongoDB Atlas
What is MongoDB Atlas?
MongoDB Atlas is MongoDB's cloud database service. It offers data distribution and mobility across major cloud providers like AWS, Azure, and Google Cloud. It is popular for its built-in automation for resource and workload optimization.
In this guide, we are going to walk through the steps to provision a MongoDB Atlas cluster from the browser. We'll walk through all of the options from configuring a cluster up until deploy.
Note: Some instructions and images are subject to change since the writing of this guide in February 2022. We'll do our best to keep as up to date as possible as changes occur.
If you're using MongoDB, checkout Prisma's MongoDB connector! You can use the Prisma Client to manage production MongoDB databases with confidence.
To get started working with MongoDB and Prisma, checkout our getting started from scratch guide or how to add to an existing project.
How to provision a MongoDB Atlas cluster
If you do not already have a MongoDB account, to begin setting up your new Atlas cluster you will navigate to the Atlas registration page and create a new account. After successful registration, you will be directed to a page where you will create your first cluster.
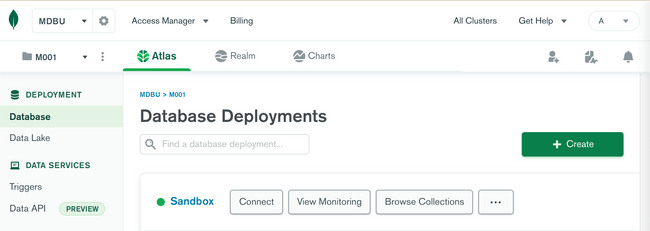
If you already have a MongoDB account registered, you can login from the registration page. Once logged in, you will want to click on the green "+ Create" button pictured below. This will take you to the same page for creating a cluster as if you were creating a cluster for the first time.
The first decision you will have to make is what kind of cluster you would like to configure. At the time of this writing, MongoDB offers three options: Serverless (Preview), Dedicated, and Shared.
The serverless instance is suitable for serverless applications with variable or infrequent traffic. There is minimal configuration and resources scale to meet your workload with the cost matching your actual usage.
The dedicated instance is the selection we will continue walking through for the remainder of the guide. It is for production applications with sophisticated workload requirements. There are advanced configuration controls such as network isolation, end-to-end encryption, and fine-grained access controls. The dedicated cluster also has on-demand performance advice around indexes, data schema, and more.
Lastly, is the shared cluster instance. This cluster type is for learning and exploring MongoDB in a sandbox-like environment. It has basic configuration controls and is best for working with sample datasets and familiarizing yourself with MongoDB.
Global Cluster Configuration
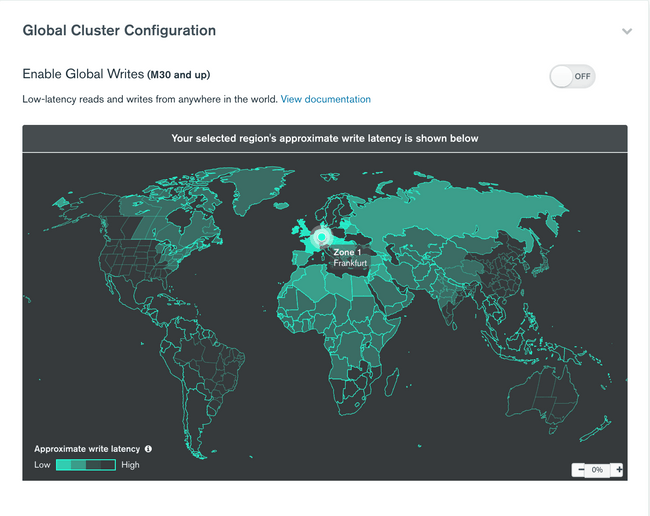
The first section after selecting a Dedicated cluster instance is Global Cluster Configuration. It displays a map that shows the approximate write latency of every region from high to low. Atlas Global Clusters are for sharded cluster zones to support location-aware read and write operations for globally distributed applications.
They are designed for a minimum cluster tier of M30 or greater sharded cluster. A cluster tier in MongoDB dictates the memory, storage, and IOPS specification for each data-bearing server in the cluster. We will speak more about tiers later on, but cluster tier specifications increase as you move up sequentially from the minimum MO cluster upwards. M30 is the recommendation for production clusters. For the purpose of this guide, we will leave this unselected and move forward. If global clusters fit your use case, you can read more about them and how to configure in the official MongoDB documentation.
Cloud Provider & Region
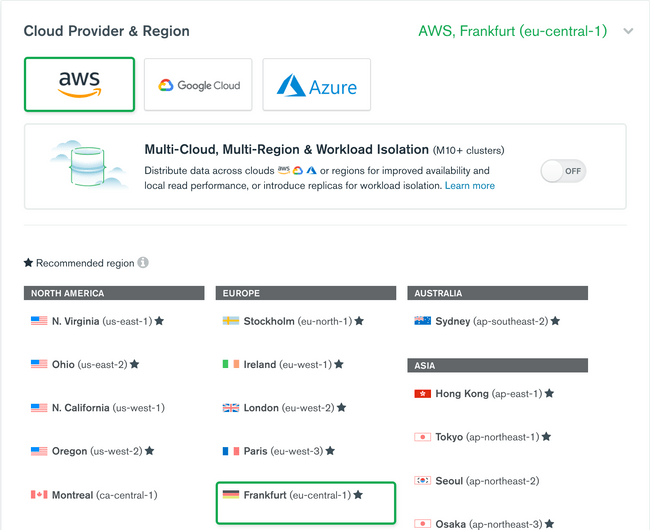
The next section provides you the option to pick which of the three major cloud providers you would like to use and their respective regions.
It is up to you which provider is best for you. One consideration is making sure that the region you need is supported and recommended. For example, in the screenshot above, we can see that the desired Frankfurt region is available on AWS and recommended by MongoDB.
NOTE: In recommended regions, Atlas replica sets always span 3 availability zone. In other regions only 2 availability zones are used.
3 availability zones are recommended in order to obtain the full benefits of a 3 member replica set and maintain high availability of data. To get more information about the region availability of your selected cloud provider, you can click on the 'i' icon at the top of the list of available regions.
Multi-Cloud, Multi-Region & Workload Isolation
An additional option within the Cloud Provider & Region section is configuring Multi-Cloud, Multi-Region & Workload Isolation(M10+ clusters). Toggling this option on enables you to distribute data across clouds or regions for improved availability and local read performance, or introduce replicas for workload isolation.
You can configure 3, 5, or 7 nodes across multiple regions and cloud providers to better withstand data center outages. You can also add replicas in additional regions to optimize for local reads or analytics nodes to isolate queries on read-only nodes to achieve workload isolation.
For the purposes of this guide, we will leave this option toggled off, but you can read in more depth in the MongoDB Documentation.
Cluster Tier
After selecting your cloud provider and region, the next step is selecting your cluster tier. MongoDB divides cluster tiers into two categories:
- Dedicated Clusters for development environments and low-traffic applications
- Dedicated Clusters for high-traffic applications and large datasets
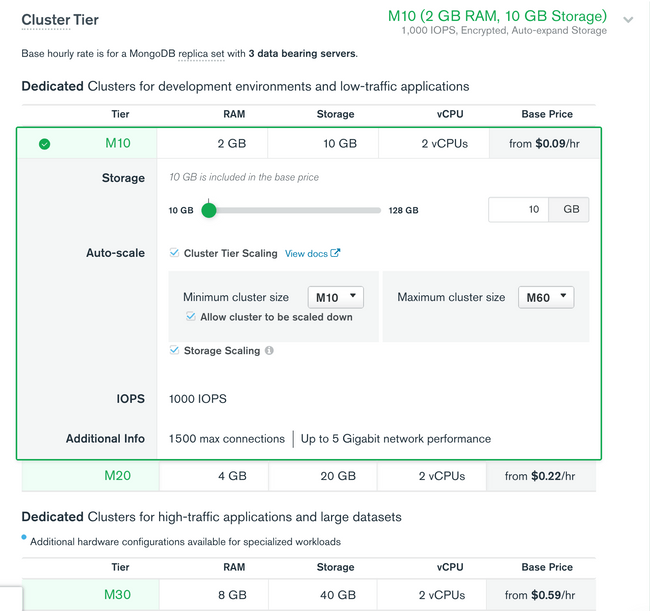
The first category includes M10 and M20 clusters while the second category ranges from M30 to M700. Each tier displays its RAM, Storage, vCPU, and its Base Price per hour.
When a tier is selected, the configuration options are available to edit if needed. You are able to adjust the storage with a slider. This increases the Base Price per hour which updates at the bottom of the screen.
The Auto-scale option has Cluster Tier Scaling selected by default. This feature enables you to configure your cluster to auto scale up or down based on traffic. You can set a minimum cluster size and a maximum depending on your limits.
Lastly, there are two sections displaying spec information on IOPS, max connections, and Gigabit network performance.
If you're using MongoDB, checkout Prisma's MongoDB connector! You can use the Prisma Client to manage production MongoDB databases with confidence.
to get started working with MongoDB and Prisma, checkout our getting started from scratch guide or how to add to an existing project.
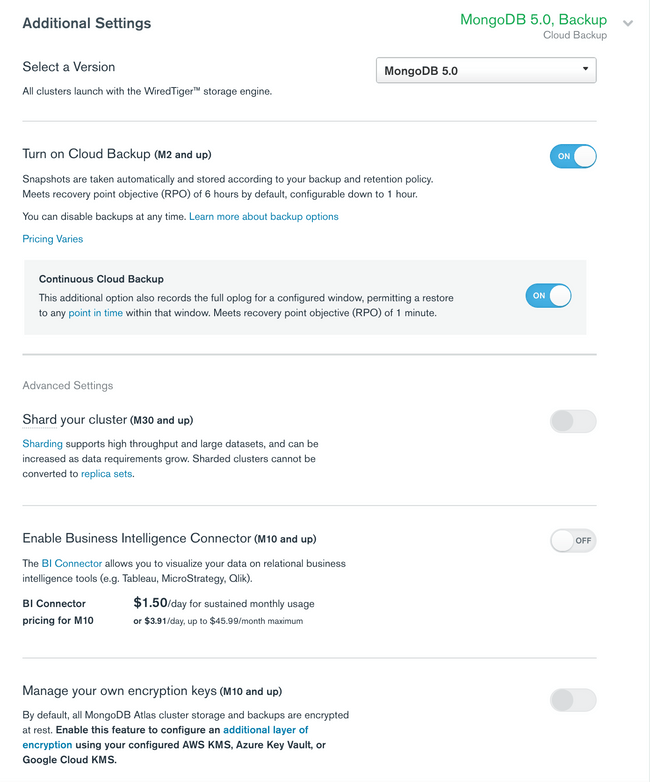
Additional Settings
Now that you have your cluster tier picked out, there are some additional settings to consider.
Version
First will be the MongoDB version. By default, the most up-to-date version will be selected, but you can choose whichever supported version you require.
Backups
Next, you will need to decide which backup strategy is best for your organization. There is Cloud Backup where snapshots are taken automatically and stored according to your backup and retention policy.
There is also Continuous Cloud Backup that when toggled on records the full oplog for a configured window of time. This permits you to restore to any point in time within that window. Which option is best for you will depend on your organization's recovery point objective (RPO).
Sharding
The next option is for configuring sharding to your environment. Sharding is the separation of data into separate database instances. This partitioning can be particularly beneficial in larger datasets and instances where it is beneficial to have data in specific regions. If it is not a requirement to shard your cluster from the beginning, you can always undergo the process later on in your application life cycle.
This option is only able to be toggled on if your cluster tier is an M30+ and your auto-scaling minimum tier is at least an M30. Sharding support high throughput and large datasets, and can be increased as data requirements grow.
Business Intelligence Connector
The penultimate additional setting is for MongoDB's Business Intelligence (BI) Connector. This feature requires a Cluster Tier of M10+. The BI Connector enables you to visualize your data on relational BI tools such as Tableau and Qlik.
Encryption
Lastly, there is the ability to toggle on the ability to manage your own encryption keys. Once again, this feature is only available if your cluster tier is an M10+. This feature gives you the ability to employ an additional layer of encryption using your own keys of choice. By default MongoDB Atlas storage and backups are encrypted at rest, but if your organization requires more encryption on top of that then this option achieves that.
Cluster Name
Now that we have crafted our cluster to our desired configuration, we can name it.
It is important to make note that a cluster cannot be renamed. Additionally, cluster names can only contain ASCII letters, numbers, and hyphens. You can now click on the Create Cluster button, wait for your replica set to spin up, and get to work with your new MongoDB instance.
Wrapping up
MongoDB's à la carte menu for setting up a cluster makes it easy to see what options are available for you to mix and match per one's needs. However, this plethora of options can be difficult to wrap one's head around if unsure of the implications.
In this guide, we walked through all of the MongoDB Atlas setup sections. We discussed each selection on its surface and provided further reading if interested in further details. Every option may not be useful for every use case, but it is important to know what is available when provisioning a new Atlas cluster.
If you're using MongoDB, checkout Prisma's MongoDB connector! You can use the Prisma Client to manage production MongoDB databases with confidence.
To get started working with MongoDB and Prisma, checkout our getting started from scratch guide or how to add to an existing project.
FAQ
MongoDB Atlas has built-in encryption at rest for disks by default with every node in the cluster.
You can also enable Encryption At Rest from the Wired Tiger storage engine with your preferred cloud provider.
You can connect MongoDB Atlas to Tableau Desktop with the BI Connector for Atlas. The BI Connector is an additional paid for tool that can only be used for MongoDB M10+ clusters.
The BI Connector provides users SQL-based access to their MongoDB databases. It can be used with most business intelligence tools including Tableau.
MongoDB Atlas has built-in monitoring for database metrics. Within the clusters view of your MongoDB Atlas dashboard, there is a View Monitoring section.
Once in that view, you can click into the metrics tab and can identify any performance issues or deployment stats.
MongoDB Atlas supports a global cluster configuration for your databases. You can distribute data globally via cross-region replication, enabling multi-region fault tolerance and responsive read access.
MongoDB Atlas also support multi-cloud database deployments.
MongoDB Atlas Global Clusters require that you define single or multi-region Zones, where each zone supports write and read operations from geographically local shards.
If you want to enable global writes in your cluster configuration, your clusters must be M30+.
