SQLite
Add Prisma ORM to an existing TypeScript project with SQLite and learn database introspection, baselining, and querying.
SQLite is a lightweight, file-based database that's perfect for development, prototyping, and small applications. It requires no setup and stores data in a local file. In this guide, you will learn how to add Prisma ORM to an existing TypeScript project, connect it to SQLite, introspect your existing database schema, and start querying with type-safe Prisma Client.
Prerequisites
1. Set up Prisma ORM
Navigate to your existing project directory and install the required dependencies:
npm install prisma @types/node @types/better-sqlite3 --save-devnpm install @prisma/client @prisma/adapter-better-sqlite3 dotenvHere's what each package does:
prisma- The Prisma CLI for running commands likeprisma init,prisma db pull, andprisma generate@prisma/client- The Prisma Client library for querying your database@prisma/adapter-better-sqlite3- The SQLite driver adapter that connects Prisma Client to your database@types/better-sqlite3- TypeScript type definitions for better-sqlite3dotenv- Loads environment variables from your.envfile
2. Initialize Prisma ORM
Set up your Prisma ORM project by creating your Prisma Schema file with the following command:
npx prisma init --datasource-provider sqlite --output ../generated/prismaThis command does a few things:
- Creates a
prisma/directory with aschema.prismafile containing your database connection configuration - Creates a
.envfile in the root directory for environment variables - Creates a
prisma.config.tsfile for Prisma configuration
The generated prisma.config.ts file looks like this:
import "dotenv/config";
import { defineConfig, env } from "prisma/config";

export default defineConfig({
  schema: "prisma/schema.prisma",
  migrations: {
    path: "prisma/migrations",
  },
  datasource: {
    url: env("DATABASE_URL"),
  },
});
The generated schema uses the ESM-first prisma-client generator with a custom output path:
generator client {
  provider = "prisma-client"
  output   = "../generated/prisma"
}

datasource db {
  provider = "sqlite"
}
A .env file should be created with the following value:
DATABASE_URL="file:./dev.db"3. Connect your database
Update the .env file to point to your existing SQLite database file:
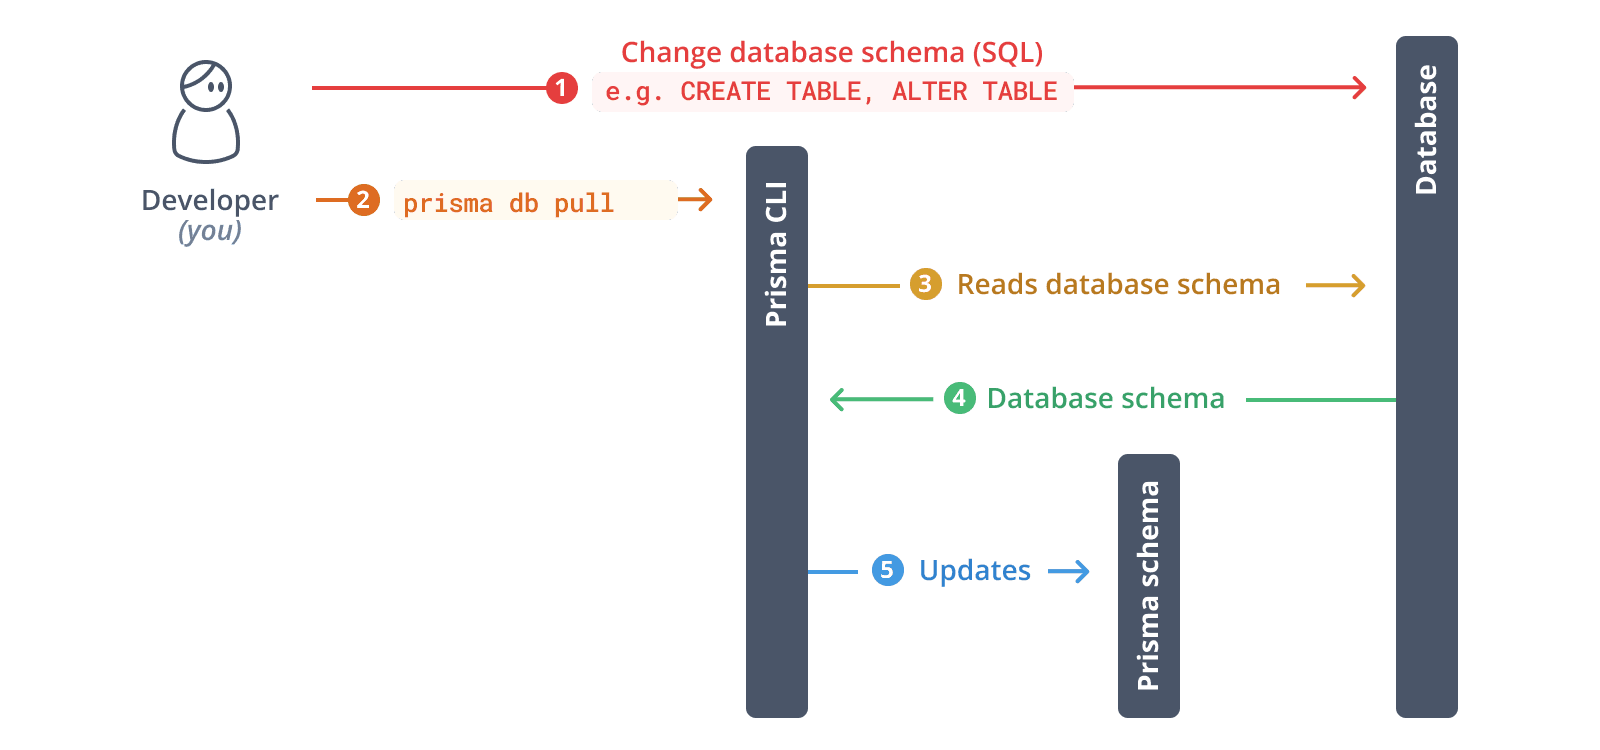
DATABASE_URL="file:./path/to/your/database.db"4. Introspect your database
Run the following command to introspect your existing database:
npx prisma db pullThis command reads the DATABASE_URL environment variable, connects to your database, and introspects the database schema. It then translates the database schema from SQL into a data model in your Prisma schema.
After introspection, your Prisma schema will contain models that represent your existing database tables.
5. Baseline your database
To use Prisma Migrate with your existing database, you need to baseline your database.
First, create a migrations directory:
mkdir -p prisma/migrations/0_initNext, generate the migration file with prisma migrate diff:
npx prisma migrate diff --from-empty --to-schema prisma/schema.prisma --script > prisma/migrations/0_init/migration.sqlReview the generated migration file to ensure it matches your database schema.
Then, mark the migration as applied:
npx prisma migrate resolve --applied 0_initYou now have a baseline for your current database schema.
6. Generate Prisma ORM types
Generate Prisma Client based on your introspected schema:
npx prisma generateThis creates a type-safe Prisma Client tailored to your database schema in the generated/prisma directory.
7. Instantiate Prisma Client
Create a utility file to instantiate Prisma Client. You need to pass an instance of Prisma ORM's driver adapter to the PrismaClient constructor:
import "dotenv/config";
import { PrismaBetterSqlite3 } from "@prisma/adapter-better-sqlite3";
import { PrismaClient } from "../generated/prisma/client";

const connectionString = `${process.env.DATABASE_URL}`;

const adapter = new PrismaBetterSqlite3({ url: connectionString });
const prisma = new PrismaClient({ adapter });

export { prisma };Bun doesn't support the native SQLite driver that better-sqlite3 relies on (see the node:sqlite reference). When targeting Bun, use the @prisma/adapter-libsql adapter instead:
import "dotenv/config";
import { PrismaLibSql } from "@prisma/adapter-libsql";
import { PrismaClient } from "../generated/prisma/client";

const adapter = new PrismaLibSql({
  url: process.env.DATABASE_URL ?? "",
});

const prisma = new PrismaClient({ adapter });

export { prisma };
8. Query your database
Now you can use Prisma Client to query your database. Create a script.ts file:
import { prisma } from "./lib/prisma";

async function main() {
  // Example: Fetch all records from a table
  // Replace 'user' with your actual model name
  const allUsers = await prisma.user.findMany();
  console.log("All users:", JSON.stringify(allUsers, null, 2));
}

main()
  .then(async () => {
    await prisma.$disconnect();
  })
  .catch(async (e) => {
    console.error(e);
    await prisma.$disconnect();
    process.exit(1);
  });
Run the script:
npx tsx script.ts9. Evolve your schema
To make changes to your database schema:
9.1. Update your Prisma schema file
Update your Prisma schema file to reflect the changes you want to make to your database schema. For example, add a new model:
model Post {
  id        Int      @id @default(autoincrement())
  title     String
  content   String?
  published Boolean  @default(false)
  authorId  Int
  author    User     @relation(fields: [authorId], references: [id])
}

model User {
  id    Int    @id @default(autoincrement())
  email String @unique
  name  String?
  posts Post[]
}
9.2. Create and apply a migration:
npx prisma migrate dev --name your_migration_nameThis command will:
- Create a new SQL migration file
- Apply the migration to your database
- Regenerate Prisma Client
10. Explore your data with Prisma Studio
- File paths must have a
file:protocol right now in the database url for SQLite - Node.js 22.5+: Works out of the box with the built-in
node:sqlitemodule- May require
NODE_OPTIONS=--experimental-sqliteenvironment variable
- May require
- Node.js 20: Requires installing
better-sqlite3as a dependency- If using pnpm 10+ with
pnpx, you'll need the--allow-build=better-sqlite3flag
- If using pnpm 10+ with
- Deno >= 2.2: Supported via built-in SQLite module
- Bun: Support for Prisma Studio with SQLite is coming soon and is not available yet
npx with better-sqlite3If you don't have node:sqlite available in your runtime or prefer not to install better-sqlite3 as a hard dependency (it adds ~10MB), you can use npx to temporarily install the required packages:
npx -p better-sqlite3 -p prisma prisma studio --url file:./path/to/your/database.dbThis command:
- Temporarily installs
better-sqlite3without adding it to your project dependencies - Runs Prisma Studio with the specified SQLite database file
- Avoids the 10MB overhead of
better-sqlite3in your project