Generating Prisma Client
This page explains how to generate Prisma Client. It also provides additional context on the generated client, typical workflows and Node.js configuration.
Prisma Client is a generated database client that's tailored to your database schema. By default, Prisma Client is generated into the node_modules/.prisma/client folder, but we highly recommend you specify an output location.
In Prisma ORM 7, Prisma Client will no longer be generated in node_modules by default and will require an output path to be defined. Learn more below on how to define an output path.
If Prisma ORM's Rust engine binaries cause large bundle sizes, slow builds, or deployment issues (for example, in serverless or edge environments), you can use it without them using this configuration of your generator block:
generator client {
  provider   = "prisma-client"
  output     = "./generated"
  engineType = "client"
}
Prisma ORM without Rust binaries has been Generally Available since v6.16.0.
Note that you need to use a driver adapter in this case.
When using this architecture:
- No Rust query engine binary is downloaded or shipped.
- The database connection pool is maintained by the native JS database driver you install (e.g.,
@prisma/adapter-pgfor PostgreSQL).
This setup can simplify deployments in serverless or edge runtimes. Learn more in the docs here.
To generate and instantiate Prisma Client:
-
Ensure that you have Prisma CLI installed on your machine.
npm install prisma --save-dev -
Add the following
generatordefinition to your Prisma schema:generator client { provider = "prisma-client" output = "./generated" }Feel free to customize the output location to match your application. Common directories are
prisma,src, or even the root of your project. -
Install the
@prisma/clientnpm package:npm install @prisma/client -
Generate Prisma Client with the following command:
npx prisma generate -
You can now instantiate Prisma Client in your code:
import { PrismaClient } from "./prisma/generated/client";
const prisma = new PrismaClient();
// use `prisma` in your application to read and write data in your DB
Important: You need to re-run the
prisma generatecommand after every change that's made to your Prisma schema to update the generated Prisma Client code.
Here is a graphical illustration of the typical workflow for generation of Prisma Client:

The location of Prisma Client
We strongly recommend you define a custom output path. In Prisma ORM version 6.6.0, not defining an output path will result in a warning. In Prisma ORM 7, the field will be required.
Using a custom output path
You can also specify a custom output path on the generator configuration, for example (assuming your schema.prisma file is located at the default prisma subfolder):
generator client {
  provider = "prisma-client"
  output   = "../src/generated/"
}
After running prisma generate for that schema file, the Prisma Client package will be located in:
./src/generated/clientTo import the PrismaClient from a custom location (for example, from a file named ./src/script.ts):
import { PrismaClient } from "./generated/client";For improved compatibility with ECMAScript modules (ESM) and to ensure consistent behaviour of Prisma ORM across different Node.js runtimes, you can also use the newer prisma-client generator. This generator is specifically designed to handle common challenges with module resolution and runtime variations, providing a smoother integration experience and less friction with bundlers.
Loading environment variables
To load environment variables in your Prisma application, you can use the prisma.config.ts file along with the env helper from prisma/config. This approach provides better type safety and configuration management.
-
First, install the required dependency:
npm install dotenv --save-dev -
Create a
.envfile in your project root (if it doesn't exist) and add your database connection string:DATABASE_URL="your_database_connection_string_here" -
Update your
prisma.config.tsfile in your project root:import "dotenv/config"; import { defineConfig, env } from "prisma/config"; export default defineConfig({ schema: "prisma/schema.prisma", migrations: { path: "prisma/migrations", }, datasource: { url: env("DATABASE_URL"), }, });
The @prisma/client npm package
The @prisma/client npm package consists of two key parts:
- The
@prisma/clientmodule itself, which only changes when you re-install the package - The
.prisma/clientfolder, which is the default location for the unique Prisma Client generated from your schema
@prisma/client/index.d.ts exports .prisma/client:
export * from ".prisma/client";This means that you still import @prisma/client in your own .ts files:
import { PrismaClient } from "@prisma/client";Prisma Client is generated from your Prisma schema and is unique to your project. Each time you change the schema (for example, by performing a schema migration) and run prisma generate, Prisma Client's code changes:
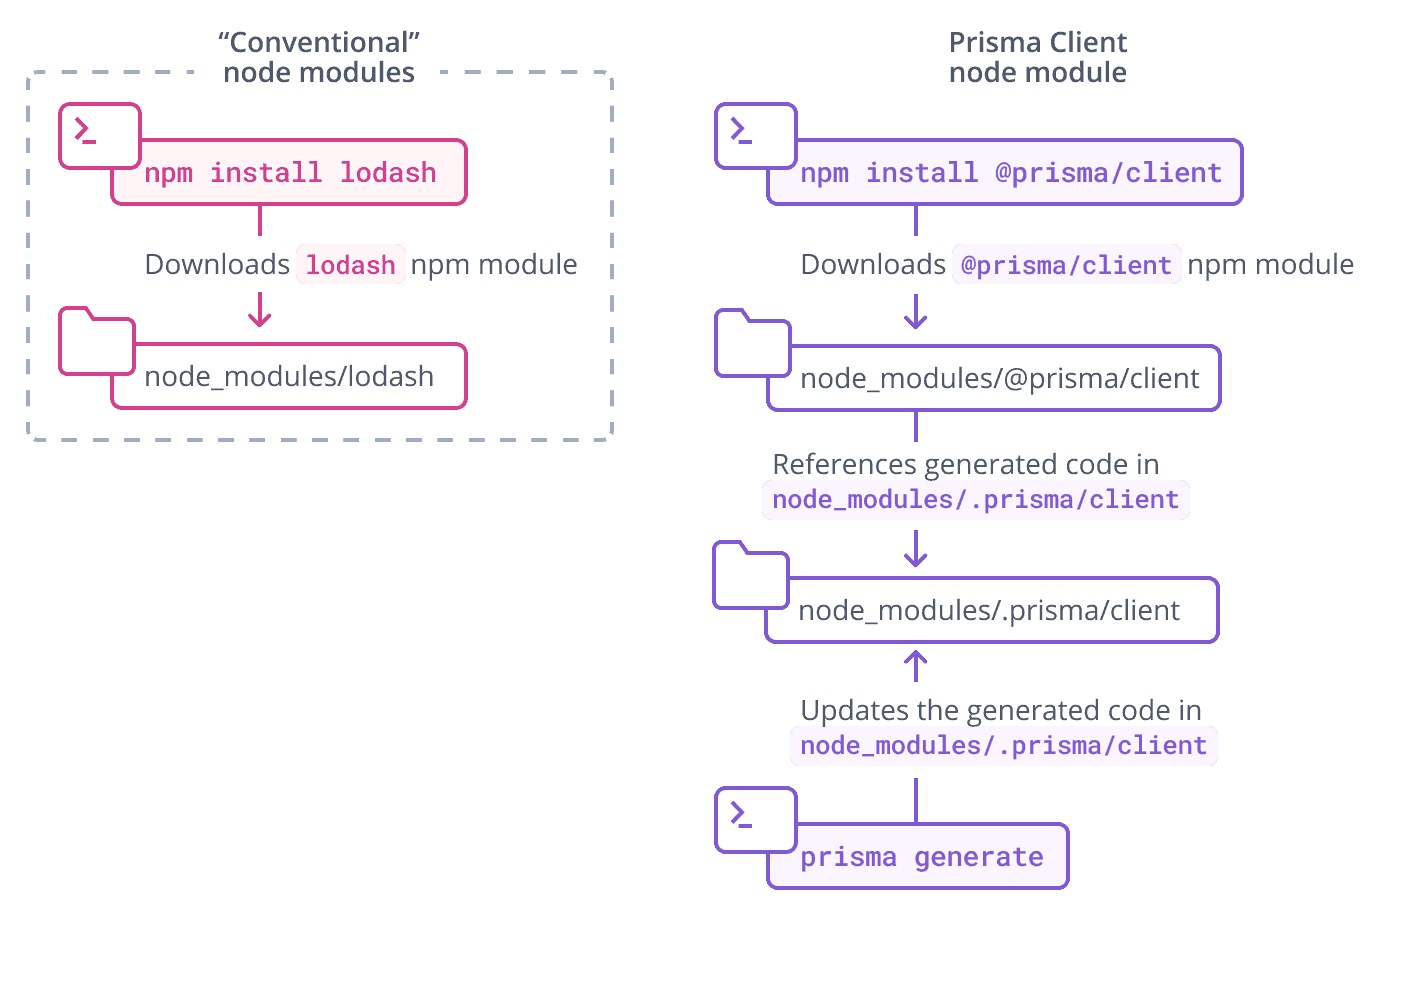
The .prisma folder is unaffected by pruning in Node.js package managers.